Installation Guide
The AERA code base can be used either as a stand alone or in combination with the AERA Visualizer. Especially for people new to the system we recommend installing the AERA Visualizer as it gives deep insights into the workings of AERA and helps in debugging code structures.
In the following we give you an overview of the installation steps necessary to install AERA and the AERA Visualizer.
AERA installation
These are the steps to install the AERA system. A detailed installation instruction can be found on GitHub.
Prerequisites
- Windows operating system
- Visual Studio
- Git
First you must do a recursive clone of the AERA repository found here. As AERA uses submodules, if you want to checkout a specific branch, it is better to specify it directly in the clone command instead of switching branches in Visual Studio.
e.g. if you want to checkout the dev branch:
git clone --recursive <GitHub Link to AERA> --branch dev
Open Visual Studio and open the project AERA.sln from the cloned repository.
If a dialog box appears asking to retarget the Windows version, click cancel.
[Optional:] Detail OID - For AERA Visualizer
If you want to use the AERA Visualizer you have to enable detail object identifiers (OIDs).
For this in the Visual Studio Solution Explorer open the section for
CoreLibrary and uncomment the define for WITH_DETAIL_OID in the
base.h file.
[Optional:] settings.xml changes - For AERA Visualizer
The AERA Visualizer requires the output from AERA.
See the file INSTALL.md file on GitHub for details.
Be sure to change the settings.xml parameter keep_invalidated_objects to "yes".
Build
Change the Solution Configuration to Release and
build the solution by clicking on the Build Menu
of Visual Studio and clicking Build Solution (Don’t worry about all the compiler warnings).
Important: You must first build the solution before you can run it.
If you have not built the solution as an extra step issues might occur.
If this is the case go to the Build Menu and click Rebuild Solution.
Run
To run different examples you can change the source file in settings.xml
(e.g. to hand-grab-sphere-learning.replicode)
To run, in Visual Studio on the Debug menu, select “Run Without Debugging”.
Both AERA and the AERA Visualizer have been tested and confirmed to work in virtual machines.
AERA Visualizer installation
The AERA Visualizer is a GUI application for visualizing the behavior of AERA.
These are the steps to install the AERA Visualizer. A detailed installation instruction can be found on GitHub.
Prerequisites
- Windows operating system
- Visual Studio
- Installed AERA system with [Optional] steps (See previous)
- Qt Framework, version 5.14.2
- Qt Visual Studio Tools extension
First you must do a recursive clone of the AERA Visualizer repository found here. As the AERA Visualizer uses submodules, if you want to checkout a specific branch, it is better to specify it in the clone command instead of switching branches in Visual Studio.
e.g. if you want to checkout the dev branch:
git clone --recursive <GitHub Link to AERA Visualizer> --branch dev
Open Visual Studio and open the project AERA_Visualizer.sln from the cloned repository.
Build
In the Solution Configurations drop-down, make sure you select Release (unless you plan to debug the Visualizer). On the Build menu, click Build Solution (Don’t worry about all the compiler warnings).
Run
To run, in Visual Studio on the Debug menu, select “Run Without Debugging” and select the settings.xml file used by AERA.
Code Base
The AERA system is written in C++ using Visual Studio. The Visual Studio Solution consists of 8 projects for 5 of which we discuss the purpose in the following. These are:
- AERA
- CoreLibrary*
- CorrelatorTest*
- output_window
- r_code
- r_comp
- r_exec
- usr_operators*
(*): Left out in the following for simplification.
Additionally, you can find a full doxygen documentation of the AERA system on https://iiim-is.github.io/AERA.
AERA
This is the main project. It includes
1) main.cpp which starts the program, loads the settings.xml file,
starts up r_exec/mem.cpp and then waits for run_time and ends by saving the results to disk to decompiled.txt
2) the settings.xml file in which all settings regarding the AERA system are set (and settings.h to process the settings),
3) different seeds to run AERA on in the replicode_v1.2 folder, and
4) the test_mem.cpp/.h which is used to inject information into AERA and get information ejected from AERA.
output_window
A simple program to show the output of the running system.
r_code
In this project you can find utility classes, definitions of general r_code-objects, atoms, as well as image definitions.
r_comp
This project includes the compiler and decompiler for replicode. It is used when replicode is loaded (e.g. from the seed as in the replicode files in the AERA project) or when the objects are decompiled for human readability.
r_exec
This is the executor for the AERA system and is where the real magic happens.
mem.cppstarts therunReductionCoreand therunTimeCore.- The
pattern_extractor.cppextracts patterns from incoming information. Together with the g_monitor.cppthey push new reduction and time jobs to the job queue.- The
*_controller.cppare the controller for the corresponding * (e.g. model (mdl), program (pgm), and more) - The
mem.cppis the parent class of the in the AERA project mentionedtest_mem.cpp, responsible for injecting information into and ejecting commands (cmd) from the system.
Visualizer
Complementary to the AERA system there exists the AERA Visualizer which can be used to visualize the learning and reasoning of the AERA system. It is developed in C++ using the Qt Framework. The visualizer reuses some of the previously described projects of the AERA system to visualize the internal knowledge base of the system, predictions, models, simulations and much more.
The visualizer reads the decompiled_objects.txt and runtime_out.txt files,
which are the final outputs of AERA’s computation process.
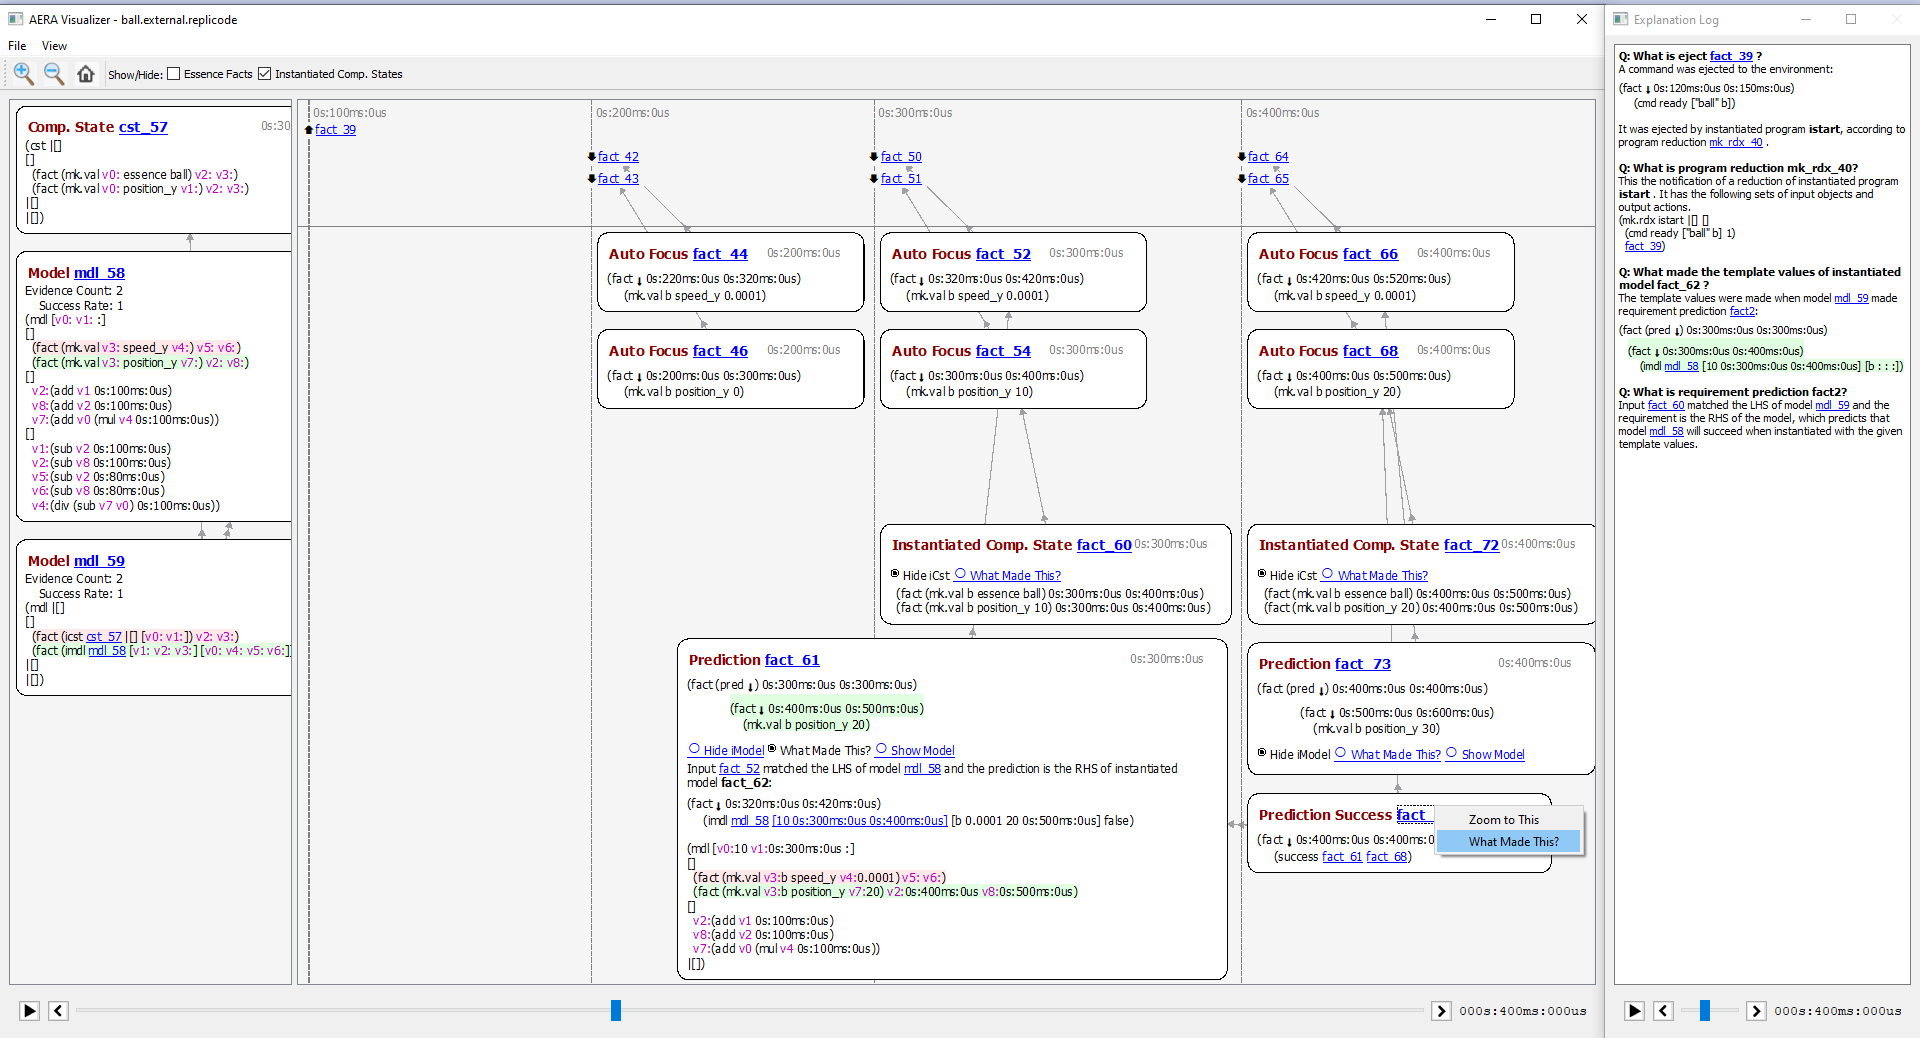
The visualizer contains a main window and an explanation log.
The main window is composed of a main scene and a model scene.
By a player panel on the bottom, the user can control the
demonstration of contents (i.e. facts, models and composite states) of the visualizer’s
main window until a specific time frame (through slider, step back and step forward buttons).
Main Scene
The main scene shows the facts that are injected by the autofocus controller. Those facts include observations through I/O device, model-based predictions, essence facts (basic knowledge about the essence of the objects), instantiated composite states, prediction failure anti-facts, simulation facts and drives. Every fact is shown in a particular time frame (which is 100 milliseconds by default), and is connected to other facts by arrows, which show the inference steps of the system. Due to having numerous fact types, several checkboxes are embedded with the main window (on the top), which allow the user to go over facts and processes that are of interest.
Model Scene
On the left side of the visualizer’s main window, the model scene shows causal models, requirement models and composite states that AERA system creates and uses. Every model and composite state is assigned a time frame, which indicates when it is created by the system.
Explanation log
The explanation log is a separate window that helps the user understand how inferences are made. It explains why and how a fact is created, a command is ejected, a program is instantiated, and a prediction is made. For instance, by right-clicking on facts on the main scene and then by clicking on “what made this?”, the user can see based on what facts the autofocus controller makes the current fact, on the explanation log. Also, there are other explanations that exist on prediction fact items that allow one to know which models are involved in making the predictions.